Table of Contents
When you visit a Guacamole instance for the first time, you will see the login screen. This screen authenticates you with Guacamole, allowing you to use Guacamole to interact with one or more remote desktops. Enter your username and password and click "login". Keep in mind this is the login for Guacamole, and not necessarily the login for the remote desktop you wish to connect to. The username and password you give Guacamole grants you access to the Guacamole system only. The usernames and passwords required for the remote desktops are independent of this.
If the correct username and password are provided, you will be taken to the home screen: a list of available remote desktop connections. This is the list of all connections which you have been granted permission to access. If you have used Guacamole in this specific web browser before, you will also see thumbnails of recently used connections.
Clicking on any connection will open that connection within the current window or tab, but multiple connections can be used simultaneously. You can easily navigate back to the home screen without disconnecting by using your browsers back button or the "Home" button in the Guacamole menu. Each connection you use will remain active until explicitly disconnected, or until you navigate away from Guacamole entirely. Active connections can be seen as thumbnails updating in real-time on the home screen.
Guacamole provides an interface for accessing much of the functionality of a desktop from within your web browser. The interface is intended to be seamless and unobtrusive. Once you open a connection, you will see a realtime view of the remote display. You can interact with this display just as you would your normal desktop. Your mouse and keyboard will function as if they were connected directly to the remote machine.
You can transfer files back and forth between your local computer and the remote desktop if it is supported by the underlying protocol and enabled on the connection. Currently, both RDP and SSH have support for file transfer, though with slightly different semantics. RDP provides file transfer by emulating a virtual drive, while SSH provides file transfer by using SFTP.
To transfer files to the remote computer, drag the files into your browser window, or use the "Upload Files" button within the Guacamole menu. If file transfer is enabled, you will see a progress indicator appear within the menu. If file transfer is not enabled or not supported, you will instead see a notification with an error message describing the problem. Completed transfers can be removed from the list by clicking "Clear Completed Transfers".
The method for downloading files from the remote computer depends on the protocol. In the case of RDP, you must drag, copy, move, or save the files into the special "Download" folder located in the virtual drive. All files dropped into this folder will automatically begin uploading to the client, and thus downloading through your browser.
To download files over SSH, you must use the guacctl utility. The guacctl utility is included with Guacamole, and allows you to initiate a file download or to change the directory in which uploaded files will be placed:
$guacctlguacctl 0.8.0, Guacamole SSH session control utility. Usage: guacctl [OPTION] [FILE]... -d, --download download each of the files listed. -s, --set-directory set the destination directory for future uploaded files.$guacctl -dFILENAME$guacctl -s$DIRECTORY
You may also create a symbol link or alias to guacctl called
guacget. When run as guacget, it behaves as if
the --download option was supplied and initiates a download for each
file specified on the command line.
Other functions, such as clipboard access and input options, are kept out of the way in a sidebar menu which is hidden by default. On a desktop or other device which has a hardware keyboard, you can show this menu by pressing Ctrl+Alt+Shift. If you are using a mobile or touchscreen device that lacks a keyboard, you can also show the menu by swiping right from the left edge of the screen. To hide the menu, press Ctrl+Alt+Shift again or swipe left across the screen.
The Guacamole menu provides options for:
-
Reading from (and writing to) the clipboard of the remote desktop
-
Uploading files and monitoring file transfer progress
-
Selecting alternative methods of typing or controlling the mouse, particularly for use on mobile or touchscreen devices
-
Zooming in and out of the remote display
Right at the top of the Guacamole menu is a text area labeled "clipboard" along with some basic instructions:
Text copied/cut within Guacamole will appear here. Changes to the text below will affect the remote clipboard.
The text area functions as an interface between the remote clipboard and the local clipboard. Text from the local clipboard can be pasted into the text area, causing that text to be sent to the clipboard of the remote desktop. Similarly, if you copy or cut text within the remote desktop, you will see that text within the text area, and can manually copy it into the local clipboard if desired.
Guacamole will automatically sync the contents of this clipboard across any other open connections within the same browser, thus copying and pasting between connections is seamless; you do not need to repeatedly visit the clipboard in the menu to copy and paste from one connection to another.
The menu provides alternative choices for keyboard input beyond simply the physical keyboard attached to your computer. In fact, if your computer lacks a physical keyboard entirely (such as a mobile phone), these may be absolutely required for typing. There are three choices: "None", "Text input", and "On-screen keyboard".
Choosing no input method at all means that keyboard input must come from a local keyboard. This is the default option, but may not be appropriate for mobile devices and touchscreen devices that lack a physical keyboard.
"Text input" allows input of keystrokes based on the input of text. While not easy to conceptualize, some devices do not actually provide a means of sending traditional keystrokes, but instead provide a means of entering text. A prime example of such a device is a smart phone, but there are other cases which make such an input mode useful even on traditional desktop computers. Choosing "Text input" tells Guacamole to infer keystrokes by tracking text entered, rather than relying on actual key presses. Guacamole will instead determine the combination of keypresses necessary to produce the same pattern of input, including deletions.
Many smart phones lack a physical keyboard entirely, and instead provide their own on-screen keyboards to allow typing. As these are not true keyboards per se and do not produce key presses, Guacamole's text input mode is required for typing on these platforms.
If you wish to type via an IME (input method editor), such as those required for Chinese, Japanese, or Korean, text input mode is required for this as well. Such IMEs function through the explicit insertion of text and do not send traditional key presses. Using text input mode within Guacamole thus allows you to use a locally-installed IME, without requiring the IME to be installed on the remote desktop.
Certain key combinations are impossible to press within a web application like Guacamole because they are reserved by the operating system (Ctrl+Alt+Del or Alt+Tab, for example) or by the web browser. If you press one of these reserved combinations, the effect will be observed locally, not remotely, and the remote desktop will receive only some of the keys.
Guacamole provides its own, built-in on-screen keyboard which allows keys to be sent to the remote desktop without affecting the local system. If the device you're using does not have certain keys which the remote desktop depends on, such as the arrow keys or Ctrl, you can use the on-screen keyboard for this, too. You can show the on-screen keyboard by selecting the "On-screen keyboard" option from the menu.
Clicking (or tapping) the buttons of the on-screen keyboard has the same effect as pressing the same buttons on a real keyboard, except that the operating system and browser will not intercept these keypresses; they will only be sent to the remote desktop.
Guacamole will default to shrinking or expanding the remote display to fit the browser window exactly, but this is not necessarily ideal. If the remote display is much larger than your local display, the screen may be impossible to see or interact with. This is especially true for mobile phones, whose screens need to be small enough to fit in the average hand.
You can scale the display on touch devices by using the familiar pinch gesture. Place two fingers on the screen and bring them closer together to zoom out or further apart to zoom in.
If your device lacks a touch screen, you can also control the zoom level through the menu. The controls for zooming in and out are located at the bottom of the menu. The current zoom level is displayed between two "-" and "+" buttons which control the zoom level in 10% increments.
In the case that your device has a touchscreen and lacks a mouse, Guacamole will emulate a mouse for the sake of interacting with remote desktops that expect mouse input. By default, Guacamole uses "absolute" mouse emulation. This means that the mouse pointer is positioned at the location of each tap on the screen.
Absolute mouse emulation is the most intuitive and tends to be what people expect when using a touch device to interact with applications designed for mouse input. Each tap on the screen is translated into a left-click at that position. Right-clicking is accomplished through pressing and holding your finger on the screen. If parts of the remote display are off-screen, you can drag your finger around the screen to pan the off-screen parts back into view.
Although absolute mouse emulation works generally well, a finger makes for a very inaccurate pointing device. To address this, Guacamole also provides "relative" mouse emulation. Relative mouse emulation provides a way to deal with the need for accurate pointer control, when a true pointer device is not present.
Guacamole's relative mouse emulation behaves similarly to the touchpad present on most modern laptops. You drag your finger across the display to move the mouse pointer, and tap the display to left-click. The pointer moves relative to the motion of your finger. Right-clicking is accomplished with a two-finger tap, and middle-clicking with a three-finger tap. The mouse scroll wheel can be operated by dragging two fingers up or down.
Because the relative mouse emulation reserves so many gestures for the different mouse buttons and actions, common touch gestures like panning and pinch-to-zoom will not work while relative mouse emulation is enabled. Instead, the screen will automatically pan to keep the mouse pointer in view, and you can zoom through the buttons in the menu.
In both absolute and relative modes, you can click-and-drag by tapping the screen and then quickly placing your finger back down. This gesture only causes the mouse button to press down, but does not release it again until you lift your finger back up.
Users and connections can be administered from within the web interface if the underlying authentication module supports this. The only officially-supported authentication module supporting this is the MySQL authentication provider, which is documented in a different chapter.
If you are using the default authentication mechanism, this section does not apply to you, and the Guacamole web interface will appear as it did in past releases. If, on the other hand, you are using the MySQL authentication provider, and you are logged in as an administrator, you will see a "Manage" button next to the "Logout" button at the top of the screen.
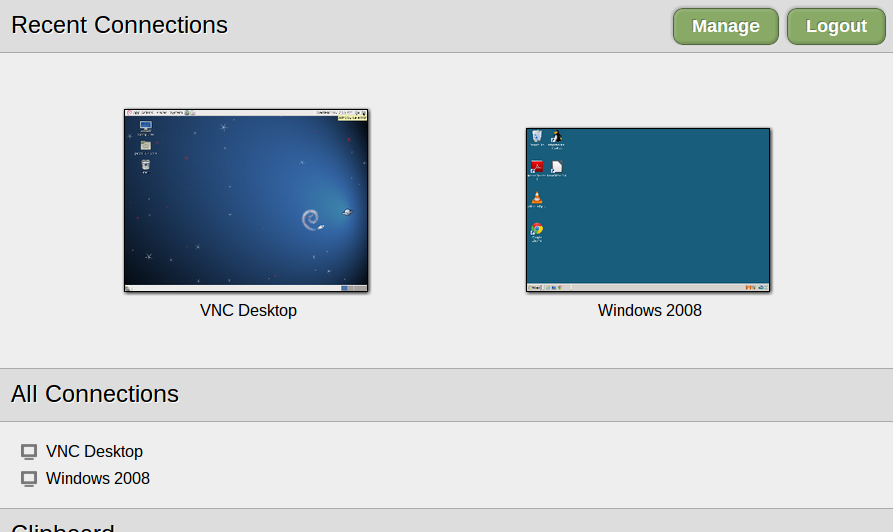
The "Manage" button
Clicking this button takes you to an administration screen where you can add or manipulate users and connections, depending on your permissions.
Once at the administration screen, you will see two sections displaying all visible users and connections. The visibility of these sections depends on your user's permissions. If you lack permission to manage users, the user management section will not display. The same goes for management of connections.
To add a new user, type the username of the new user within the text box inside the user management section, and click the "Add" button. The new user will be added and made available. The new user will have no access to any existing connections, no administrative privileges, and no password, and will not be able to login. You will need to set the user's password first in order to allow login.
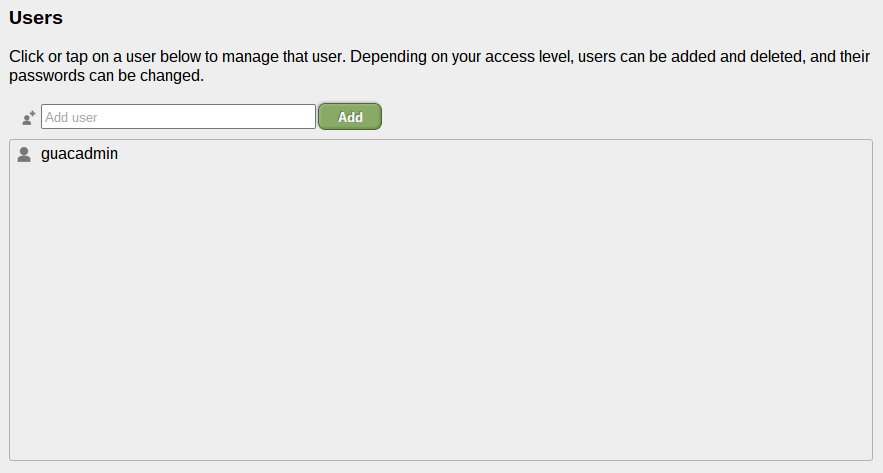
User management interface
To edit a user, just click on the user you wish to edit. A small dialog will display allowing you to change the user's password, add or remove administrative permissions, and add or remove access to specific connections or groups.
If you have delete permission on the user, you will also see a "Delete" button. Clicking this button will permanently delete the user.

Editing a user
To add a new connection, click the "New Connection" button. A connection creation dialog will appear, allowing you to enter the details of the connection, such as its location, parameters, and name. This name should be descriptive, but must also be unique.
Once you click "Save", the new connection will be added, but will initially only be usable by administrators and your current user. To add access to the new connection to another existing user, you must edit that user, checking the box corresponding to the new connection.
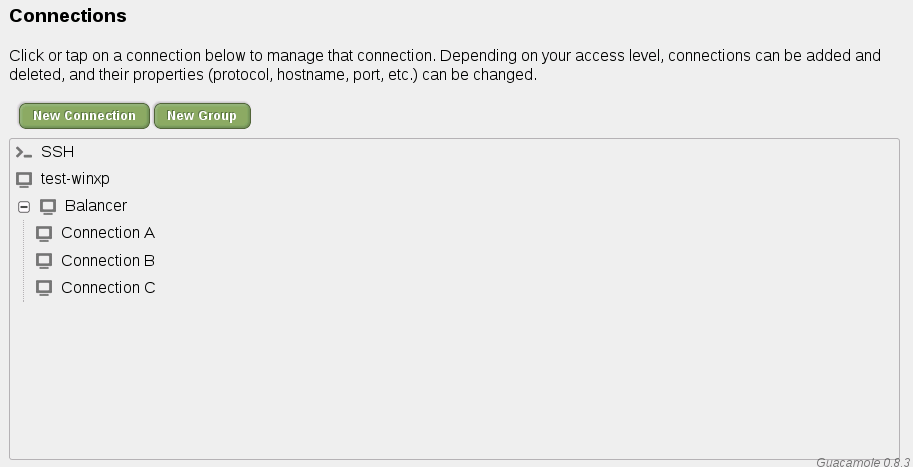
Connection management interface
Editing a connection works identically to editing a user. Click on the connection you wish to edit. A dialog will pop up displaying all parameters associated with the connection, allowing you to change the protocol, associated parameters, and to view the connection history.
Connections can also be renamed or moved by altering the contents of the "Name" or "Location" fields.
If you have delete permission on the connection, you will also see a "Delete" button. Clicking this button will permanently delete the connection.
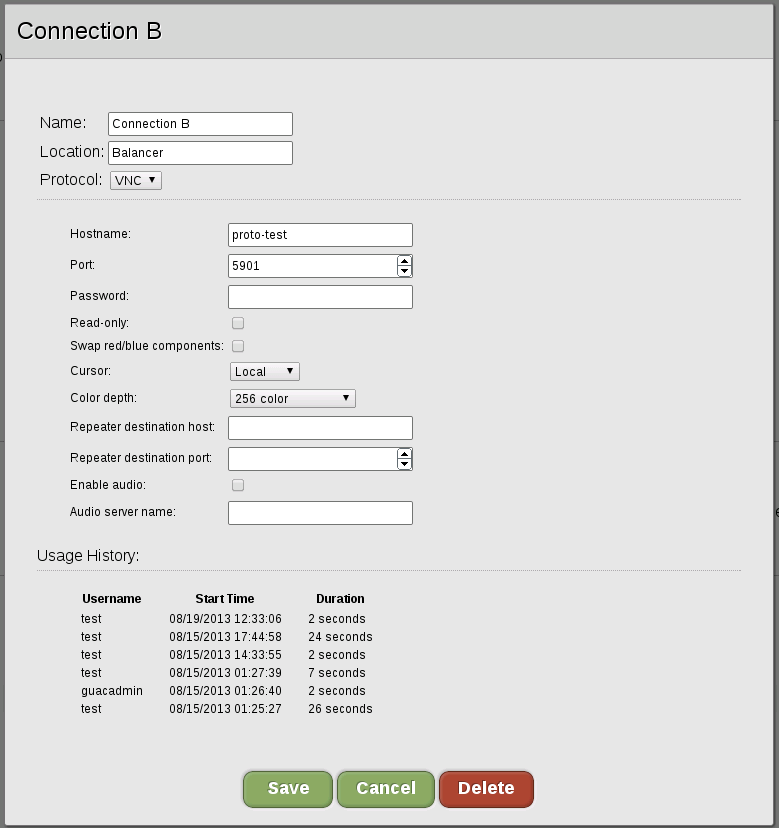
Editing a connection
Connections can be placed within groups for purposes of organization or load balancing. Each group is displayed in connection lists as a "+" symbol followed by its name. The group can be expanded revealing any contained connections or groups. If the group is a balancing group, the group can be used as a connection, and the least-used contained connection will be used.
To add a new connection group, click the "New Group" button. A connection group creation dialog will appear, allowing you to enter the details of the group. Just as with connections, you can enter the location and name, which should be descriptive and unique. Duplicate names are not allowed.
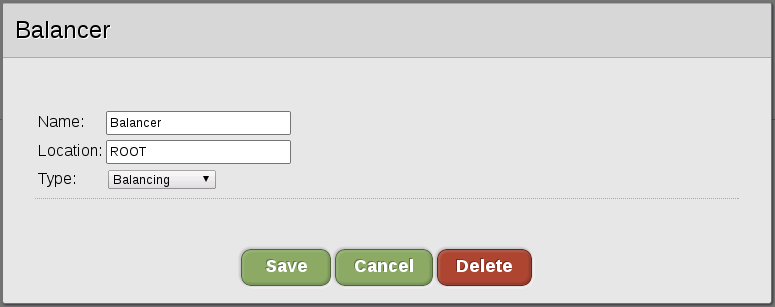
Editing a connection group
You can edit existing connection groups by clicking on them within the administration interface, just like with users and connections. From within the dialog that appears, you can rename, move, and change the properties of existing connection groups.
Connection groups can be either "organizational" or "balancing". Each group can contain any number of other connections or groups, but the semantics of the group change depending on the type.
An organizational group behaves exactly as a folder or directory in a file system. It simply contains connections and other groups, but provides no other behavior. Clicking on an organizational group within a connection list will expand the group, revealing its contents.
A balancing group behaves as a connection. It dynamically balances load across the connections it contains, choosing the connection with the fewest number of active users. Unlike organizational groups, clicking on a balancing group causes a new connection to be opened. The actual underlying connection used depends on which connection has the least load at the time the group was clicked.
When you are done and wish to logout of Guacamole completely, find the original connection interface tab and click the "logout" button. Beware that this will close all current connections and end your Guacamole session.
Note that this is not the same as disconnecting from a single connection. To disconnect, simply close the tab or window with the remote desktop in it. Closing a tab or window automatically disconnects from the associated remote desktop without logging you out of Guacamole completely.
If you logout of Guacamole, all active connections are closed, and can only be accessed by logging in again and reconnecting.